Creamy Broccoli and Fennel Soup with Cheddar, Gruyere and Crispy Onions

photo (11)

Spring is here!  What a wondrous and renewing season it is.  Wait, that was a couple of weeks ago, Mother Nature seems to have other plans and has brought back the biting cold weather reminiscent of winter.  What a cruel, cruel, joke!  Yesterday I was so cold, with the wind and rain whipping outside of my window, all I craved was something warm to fill my belly.  So, soup was naturally a perfect choice for our dinner.

I remember when I tried Broccoli and Cheddar soup for the first time.  It was magical.  It was sublime.  It probably had no real broccoli OR cheddar in it.  I still love it though, but have now realized how easy and healthier it is to make at home.  My version has fewer calories too, because I swap full fat cream for 2% milk and a little bit of cornstarch to thicken it.  I added some fennel to make it sing, and I love topping soup with crispy things, mine with french fried onions, but you can use whatever your heart desires!  Silky, delicious, and filling, what more could you want?

Serves 4

2 tbsp olive oil

1/2 a small onion, chopped

2 tbsp of fresh fennel tops, chopped

1 small head of broccoli, chopped

1 cube vegetable stock

1 tsp salt

2 cups water

3 cups 2% milk

1 tbsp instant cornstarch

3/4 cup grated white cheddar cheese

1/4 cup grated Gruyère cheese

Crispy onions (or whatever you want)

Freshly ground pepper, to taste

In a large stock pot over medium high heat, add the olive oil.  Add the onion, fennel tops and broccoli, sauté for about 8 minutes or until soft.  Add the vegetable stock, salt, water and milk and lower heat to medium low.  Cook for about 20 minutes.

Take off heat and let cool for about 10 minutes before processing.  Place soup in a blender and pulse, for less time if you want it chunky.  I wanted mine smooth, so I pulsed for about 45 seconds.

Return to stock pot, add the cornstarch and reheat for about 2 more minutes.  Add the cheeses and stir.  Serve into bowls and top with a little more cheese, crispy onions and freshly ground pepper.

From my kitchen to yours,

Carla

Jamie Oliver’s Pukka Yellow Curry

photo (9)

Let me tell you something.  Mr. Oliver makes a damn good curry.  I am in shock!!!  Most of the time, when I try Indian food recipes that aren’t from India, I get very, very disappointed.  This dish has now gone into my hall of fame of favorite curries.  It has a lovely sweetness to it, from the yellow peppers,  but just the right kick from the chillies.  I am happy I made enough for both my daughter and I to have leftovers tomorrow!  Unfortunately the hubs won’t be able to try, but he doesn’t like chickpeas anyway.

As I usually do, I tweaked the recipe here and there and added some store-bought curry paste I had in the pantry.  I will give you the recipe I made, but if you want to make it just like Jamie’s, you can find the recipe here.

Serves 4

4 chicken thighs

2 onions

4 garlic cloves

2 yellow peppers

1 thumb sized piece of ginger

1 cube chicken stock

1 jalapeño pepper

1/2 bunch fresh cilantro

1 tbsp honey

1 tsp turmeric

2 tsp curry powder

2 tbsp mild curry paste

1 tbsp tomato paste

500ml of boiling water

400g canned chickpeas

Olive oil

Salt and pepper to taste

1 cup basmati rice

Peel the onions, garlic and de-rib and de-seed the yellow peppers.  Cut into quarters, and add to a food processor and pulse until chopped.  Add the ginger, crumbled chicken stock cube, the jalapeño pepper, cilantro stems (reserve the leaves for later) ,spices and honey.  Pulse until you have a thick paste.

In a large sauté pan, heat the olive oil over medium high heat, add the chicken thighs, skin down, and cook for about 5 minutes, turn and cook another 5 minutes.  Put the chicken on a plate and reserve, lower the heat.  Add the curry paste and tomato purée, and cook, stirring constantly for 3-4 minutes.  Add the pureed vegetables, and raise heat to medium, and cook for about 5 minutes.  Add the boiling water, drained chickpeas and chicken thighs. Season with salt and pepper. Stir to make sure they are mixed well, cover and cook for about an hour, or until most of the cooking liquid has evaporated.

20 minutes before it is done, place the cup of Basmati rice in 2 cups of water, boil until all the liquid has evaporated.

Serve together, and if you have some Naan…..please use it.  You will be sopping up this curry!

From my kitchen to yours,

Carla

Black Beluga Lentil Salad with Bacon, Blue Cheese and Cilantro Vinaigrette

photo (8)

When I had my restaurant in Barcelona, vacation was something that I had to do quickly and closely.  For me, the best place to make me relax and feel transported without travelling too far was Ibiza.  Ibiza is only 30 minutes by plane from Barcelona, but it is worlds apart.  It is what you make it, you can party all night and day, or you can relax with your family.  I chose the latter, obviously.  But one place I really loved and still do, is Jockey Club.  It is a beach bar restaurant, and my favorite thing to do is get there early, grab some beach chairs and spend all day lounging by the crystal clear waters, and listening to some fabulous music.  The food is pretty amazing, but I would always order their lentil salad with a bottle of Enate Rosado, a spanish Rosé wine.  I don’t get to go to Ibiza as often as I wish now, but I do try to recreate their lentil salad at home.  I change it often, but never their 3 key ingredients: black beluga lentils, bacon and cheese.  They use goat cheese, but you can substitute any soft cheese you have at home.  This salad is very quick and easy to make, but it is incredibly decadent, so if you serve it as an appetizer at a dinner party you can´t go wrong!  I personally love it, and tonight I used the veggies I had in my fridge.  You can substitute what you like, but this version is absolutely fantastic, I really really recommend you try it!  Also, you can omit the bacon and chicken stock if you are vegetarian, and it will still taste delicious.

Serves 4

1/2 cup black beluga lentils (or puy lentils if you can’t find these)

1 garlic clove, with skin

1 bay leaf

2 cups chicken stock

1/4 cup olive oil

1 small eggplant, cut in 1 inch cubes

1/2 small yellow pepper, cut into 1 inch dice

1/2 small green tomato, diced

1/4 cup bacon, sliced

2 tbsp blue cheese, crumbled

For the cilantro vinaigrette:

1/4 cup extra virgin olive oil

1 tsp white wine vinegar

1 small bunch cilantro, minced

1 garlic clove, smashed and minced

1 tsp whole grain Dijon mustard

Salt and pepper to taste

6-7 leaves of Romaine lettuce or Frisee lettuce, washed and chopped

In a medium stock pot, place the chicken stock, bay leaf and garlic to boil.  When boiling, add the lentils and cook for 15 minutes.  Strain and set aside to cool.

In a large sauté pan, over high heat, add the olive oil.  Fry the bacon and eggplant until golden, about 7-10 minutes, stirring constantly.  Strain over paper towels.

Mix all the ingredients for the vinaigrette, shake well.

In a large bowl, place the lentils, bacon, eggplant, yellow pepper, tomato and blue cheese.  Add about 2 tbsp of the vinaigrette, mix well.

To serve, place the lettuce in a salad bowl, then top with the lentils.  Drizzle half a tbsp over the lettuce, enjoy!

From my kitchen to yours,

Carla

Spaghetti squash, Spinach and Ricotta Lasagna

photo (7)

It’s been a looong time readers!  I apologize for my absence, but life gets in the way sometimes.   Over in our household, things have changed radically!  In November our little girl was born, and you know what newborns mean!  Amazement, happiness, wonder, lack of sleep and no time.  Yet, I have to say that we are lucky, she sleeps through the night already and is a pretty easy baby, so that has freed up some time for me to be able to cook again.  Granted, not much time, but on weekends I get to make nice comfort food because the hubby and my eldest daughter are around to give me a hand.

Since the birth of our little one, I have started to eat more vegetables, in preparation for starting her off on the right foot.  What I didn’t expect, is how much better I feel, and how heavy and bloated I get when I eat meat.  Now, don´t get me wrong, I looove meat, but I think I am going to do weekday vegetarianism and save the meat for the weekends!

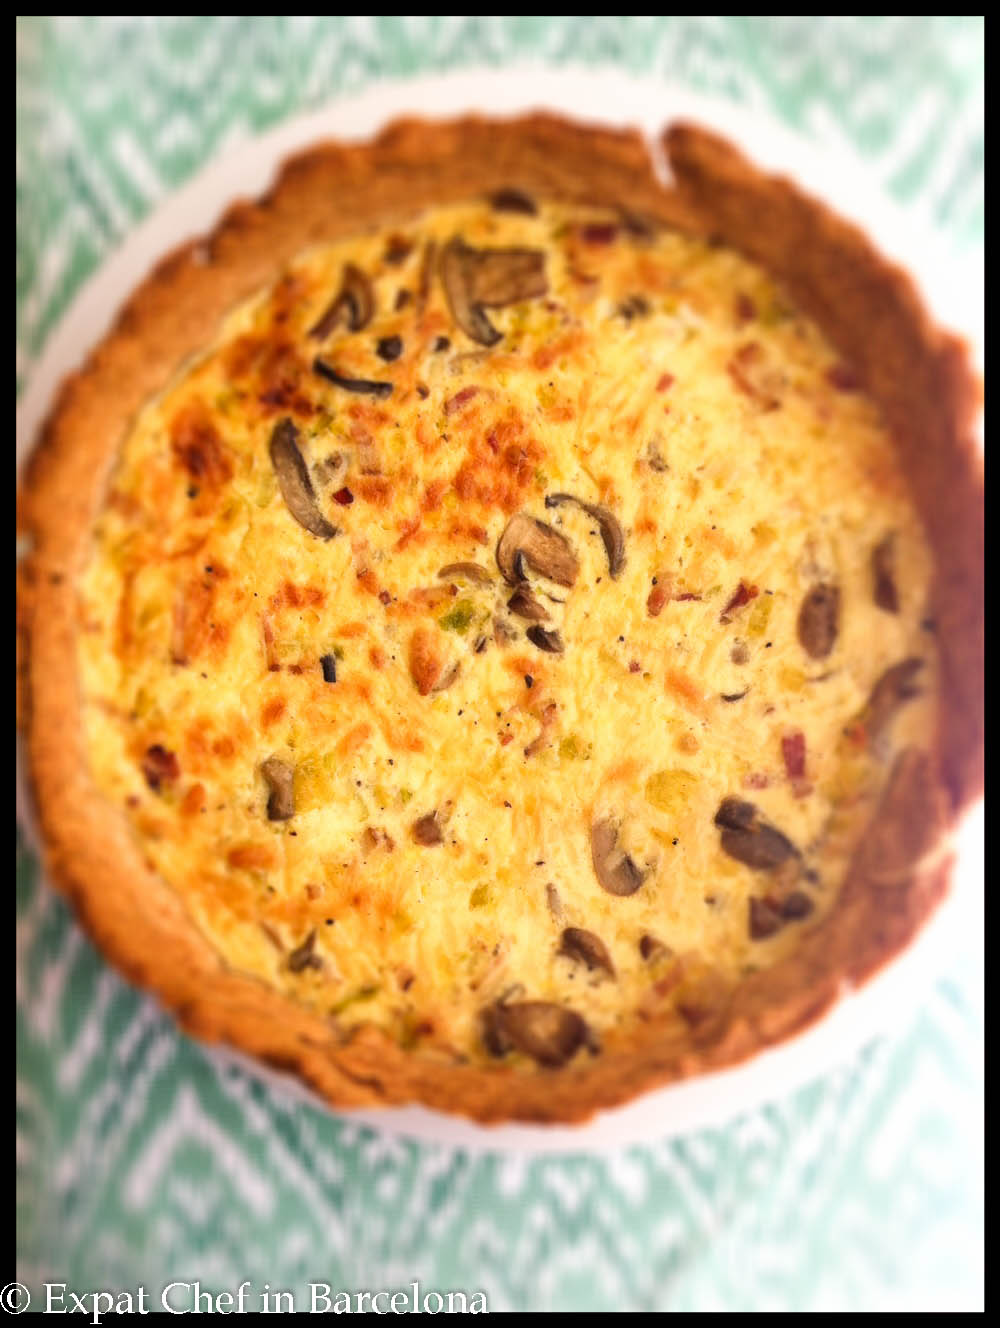
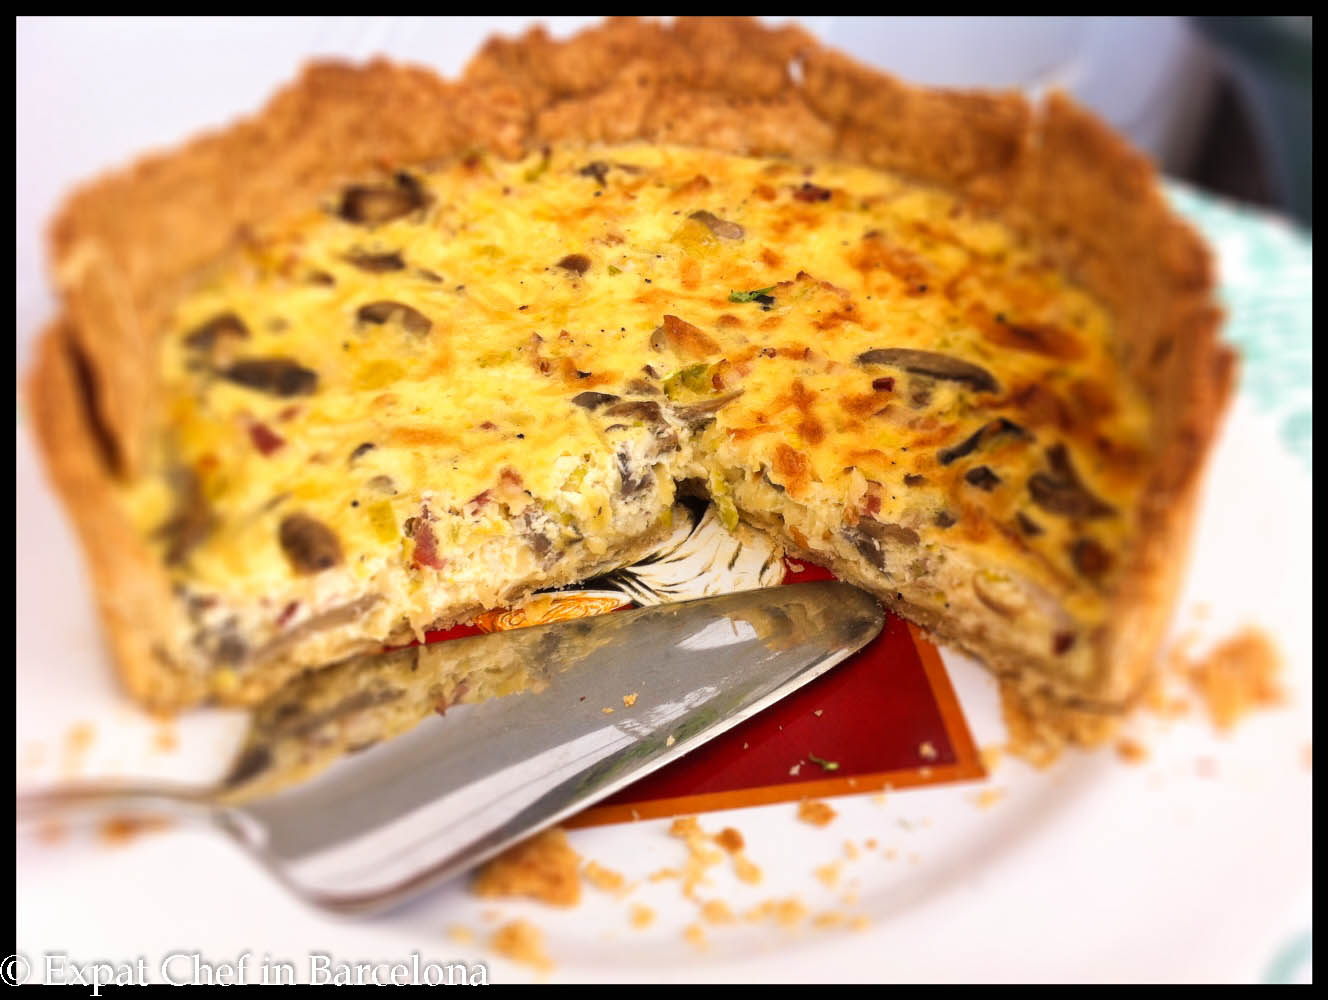
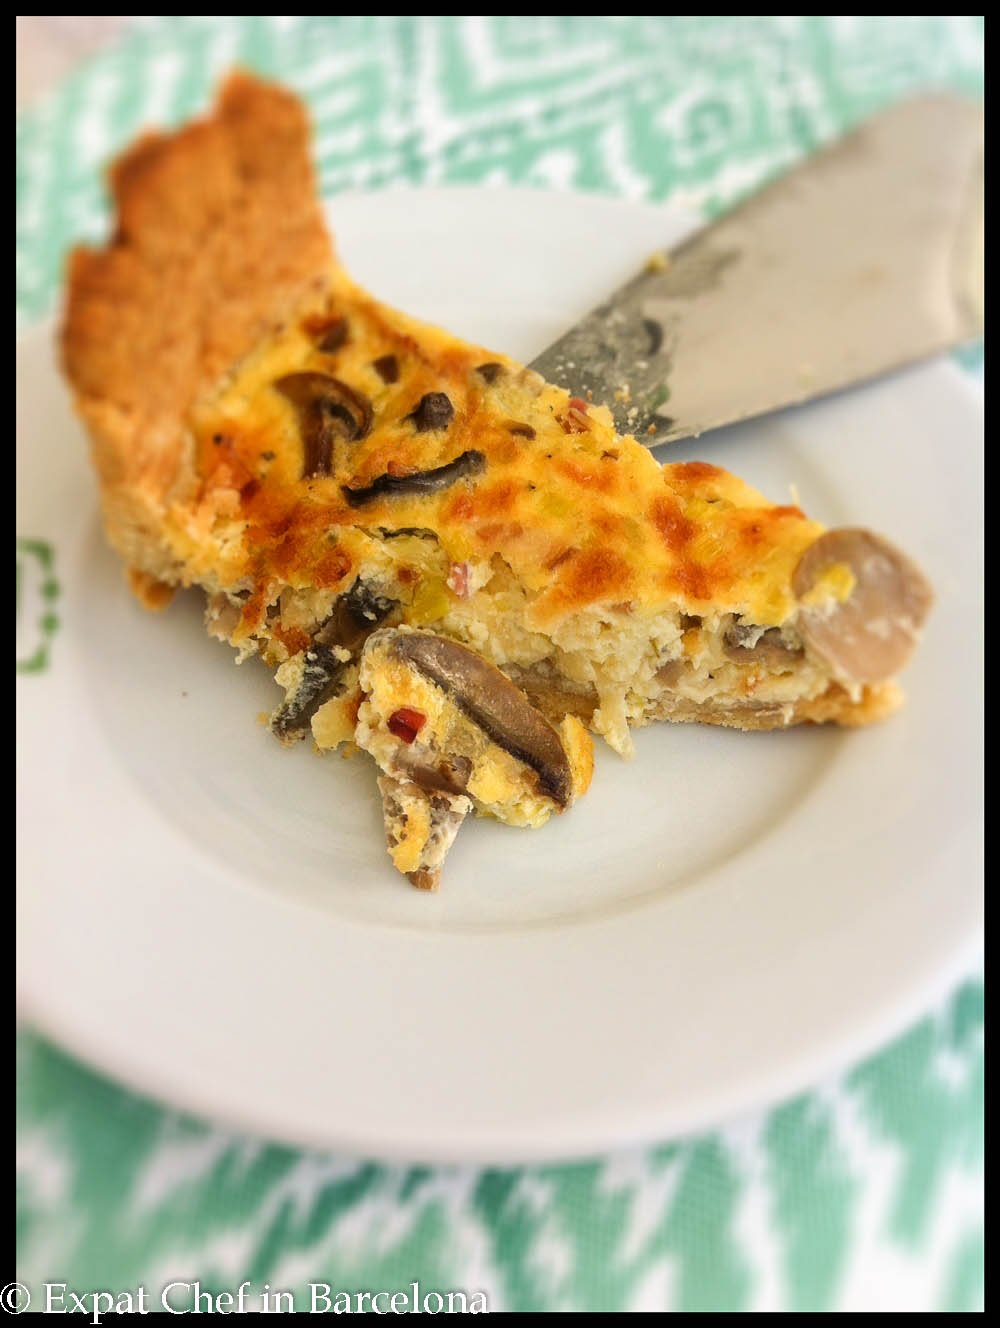
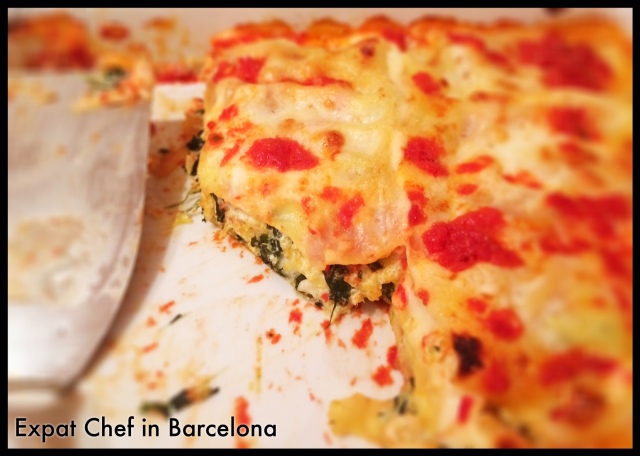
Just recently I started seeing spaghetti squash at the market, and its been two weeks in a row that I cook it at home.  This recipe was inspired by a Jamie Oliver show I saw last week, but he used butternut squash instead.  This recipe is mine, because I know he didn’t use any béchamel and his was a sort of rotolo, like a rolled up pasta.  I don´t get to watch too much tv now and when I do, I usually don’t get to see the whole program!

I wasn’t sure about this combination of veggies, but it works marvelously and is going to be a repeat offender in our house!  My daughter who only ate spinach in spanakopita, now loves this dish and bonus she gets squash and  spinach!  This is a sunday type meal, since it does take a little bit of extra time to make it.  But please, do try it, I guarantee you will not miss the meat and will keep this recipe to use again and again!

Spaghetti Squash, Spinach and Ricotta Lasagna

Serves 8

12 sheets precooked lasagna sheets

1 recipe garlic spinach (below)

1 small spaghetti squash, roasted and seeded, peeled and mashed

1 recipe tomato sauce (below)

1 recipe béchamel (below)

1 small tub of ricotta cheese

1 mozzarella, chopped

2 tbsp grated Parmigiano Reggiano

To make the lasagna, preheat your oven to 190C (375F).  In a large bowl, mix the squash, spinach and ricotta, try it to see if it needs any more salt or pepper. In a baking dish, spoon some of your tomato sauce on the bottom so the pasta sheets won’t stick.  Then lay 3 lasagna sheets down, and top each with a large spoonful of the squash mixture, a little bit of the mozzarella, béchamel sauce, and then some tomato sauce.  Repeat 3 times until you get to your last layer, which you only top with the remaining béchamel, tomato, mozzarella and Parmigiano Reggiano cheese.  Cover with aluminum foil and bake in the oven for 30 minutes.  Take off the aluminum foil, raise the heat to 200C (400F) and cook for another 10 minutes.  Let it rest for 10-15 minutes before serving (or you WILL burn your tongue off!)

For the garlic spinach recipe:

300 g frozen baby spinach

1 tbsp of olive oil

2 garlic cloves, chopped

Salt and pepper to taste

water, to defrost spinach

In a large sauté pan, add the frozen spinach, garlic, oil and water (just enough to cover the spinach, like half a cup).  Over medium high heat, cook the spinach until it defrosts and the water has evaporated.  Add salt and pepper and then place in a fine mesh colander to strain the cooking water out of the spinach.  Place in a large bowl to cool, set aside.

Meanwhile, make the tomato sauce…

Tomato Sauce recipe:

2 400g tins of pureed tomatoes

3 garlic cloves, minced

1 dried red chili pepper

1/4 tsp of oregano

Salt and pepper to taste

1 tbsp of olive oil

In a sauté pan over medium heat, add the olive oil, garlic, chili, and oregano.  Heat until the garlic is fragrant, about 2 minutes.  Add the tomatoes, 3/4 of the can full of water, and salt and pepper to taste.  Cook for 20 minutes.  Meanwhile make the béchamel sauce….

Béchamel Recipe:

4 tbsp unsalted butter

4 tbsp flour

3 cups cold milk

dash of white pepper

dash of freshly grated nutmeg

1/4 tsp salt

In a heavy bottomed saucepan over medium low heat, add the butter and melt.  When foamy, add the flour and whisk until completely incorporated and let cook for about 4 minutes, whisking constantly.  In a constant drizzle add the cold milk and keep whisking until added.  Continue to cook, whisking to make sure you have no lumps until the sauce thickens, about 15 minutes.  Take off heat and add the pepper, nutmeg and salt.

From my kitchen to yours,

Carla

Leek, Bacon, and Mushroom Quiche

Quiche with leeks, bacon and mushrooms


quiche with leeks, bacon and mushroom


photo 3


Last night around 10 pm, I remembered that I had invited a friend over for lunch……uh oh.  I had completely forgotten, and didn’t have anything in mind or ready to prepare.  So I looked in my fridge and pantry……and voila!  I love that you can make a Quiche out of basically anything.  Just as long as you have the mains, which are flour, eggs, cream and cheese, it doesn’t matter what the fillings are.  I think that it’s versatility has made it a mainstay in my house!.  So these were the ingredients I had in my pantry and fridge, but feel free to swap any of the ingredients for the ones you have on hand.

So here’s what you’re going to need:

For the crust:

250g all-purpose flour

150g butter, chilled and cut into 1 inch cubes

1 tsp salt

1 egg

1 tbsp cold milk

For the filling:

1 leek, halved and thinly sliced

2 slices bacon, julienned

1 small can sliced mushrooms, drained

1 egg

3 egg yolks

300ml heavy cream

1 1/2 cups Emmenthal (swiss cheese), grated

1 tsp salt

freshly ground pepper to taste

pinch of nutmeg


In a large bowl, add the flour, salt, and butter, mix with a pastry blender until it resembles coarse sand.  Add the egg and milk, and mix with your hands until it forms a ball.  Flatten it with your hand into a disk, and cover with plastic wrap and refrigerate for 30 minutes.

In the meantime, make the filling.  Saute the leeks and bacon together over low heat for about 10 minutes until soft and bacon is cooked but not crispy.  Let cool.  In a large bowl, mix the cream, eggs, salt, pepper and nutmeg.  Add the leek mixture, and half of the grated cheese.  Mix well and set aside.

Pre-heat oven to 190C (375F), take dough out of the fridge and place on a counter dusted with flour.  Roll out the dough into a disk that is about 2mm thick.  Place in a buttered tart or springform pan, cover with plastic and refrigerate for another 20 minutes.

Take the dough out, and with a fork pinch all over.  Cover with parchment paper and place pie weights or beans in the pan.  Cook in the oven for 15 minutes.  Reduce the heat to 170C (350F) and remove the parchment and pie weights, and cook for another 5 minutes.

Take out of the oven, and sprinkle the remaining cheese onto the bottom of the crust, and then add the filling mixture.  Cook for about 25-30 minutes, or until it is set but still has a slight wobble.  Let cool on a rack and serve warm or at room temperature.  Serve with a green salad and basic vinaigrette!

From my kitchen to yours,

Carla

Moros y Cristianos – Refried Black Beans and Rice

Moros


I grew up in Miami, and one of our Saturday night staples was going to Habana Vieja Restaurant on Coral Way.  This “upscale” Cuban restaurant was (and I say was because it sadly no longer exists) where we would go eat dishes that I thought had the funniest names; Vaca Frita (Fried Cow), Ropa Vieja (Old Clothes), Fufu con Masitas (Mashed plantain with pork chunks, and last but not least, Moros, or Moros y Cristianos.  As a kid, I obviously was not aware of the deep historic meaning, and racial undertones, of the name of the dish.  It literally translates to Arabs (moros) and Christians (cristianos).  This has its roots in old Spain, which once, and still now to a degree, is a mixture of both cultures, as does most of the Cuban food we eat today.

All things aside, this is one of my favorite things to eat!  Here in Spain there is a lot of white bean and lentil consuption….but only in cuban or other latin restaurants will you find the black or red pinto varieties.  I miss my latin roots so much, and so does my daughter, that at least once a month I make beans and rice, and of course, the next day we mix them up and fry them up to serve alongside whatever we are eating….fish, chicken, beef, pork, you name it.  Most of the time, we eat it on its own, since its so delicious and it really doesn’t need to be an accompaniment.  I am sure you can find a million different recipes, but I hope you try mine, with a touch of roast red peppers and some sherry.  Also, I think my mom’s white rice is pretty spectacular!  To make a vegetarian version of these beans, just swap the beef bouillon cube for a vegetable one, and you have a perfectly well-balanced meal!

So here’s what you’re going to need:

Serves 4-6

For the beans:

2 cups black beans, soaked in water and salt overnight

2 tbsp olive oil

1/4 large onion, minced

1 clove garlic, minced

1/4 large green pepper, minced

1 tsp dried oregano

Salt and Pepper to taste

1 small can of roast red peppers, minced

1/4 cup sherry

1 beef or vegetable bouillon cube

For the Rice:

1 1/2 cups long grain white rice

1 tbsp onion, minced

1 small garlic clove, minced

1 tbsp green pepper, minced

2 tbsp olive oil

Salt to taste

3 cups water


To make the beans:

In a large dutch oven, heat the olive oil over medium heat.  Add the onion, green pepper, garlic and oregano, sauté for 5-6 minutes, or until translucent.  Add the red pepper, sherry and bullion cube, and cook until the sherry has almost evaporated.  Add the pre soaked beans, salt and enough water to cover them about 3 inches.  Raise heat to high, cover leaving just a crack open so the steam can come out.  When it boils, lower the heat to medium low, and let cook until the beans are tender and it has thickened into a stew consistency.  About 2 hours.  If you find that the water has evaporated and the beans aren’t tender enough, boil another cup of water and add it to the beans.  Never add cold water because it will “stunt” the cooking of the beans.

In the mean time, prepare the rice.  Wash the rice with cold water, and strain.  In a medium stock pot, heat the olive oil over medium heat.  Add the onion, garlic and green pepper.  Saute for about 5 minutes, and add the rice, give it a good stir to coat the rice with the oil and veggies.  Add the salt to the water, and stir it up, then add to your rice.  Raise the heat to high, bring to a boil and then lower to medium low, with the stock pot half covered like the beans.  When the water is halfway evaporated, (about 10 minutes, you will see the top part of the rice to be dry-ish and hear water bubbling in the bottom) with a large wooden spoon, “turn” the rice so that the wetter rice is on top, and the dryer rice goes on the bottom.  Cook for another 10 minutes, or until the rice is dry.  It will be kind of sticky, but don’t worry.  Take off the heat, cover it and let it rest another 10 minutes, and before serving fluff it up with a fork.

When the beans are ready, you can either serve them with the rice on the side, or grab a cup of the rice, and add a spoonful of the beans, mix well.  That is now Moros!

From my kitchen to yours,

Carla

Arista di Maiale Al Rosmarino – Pork with Rosemary

Pork with Rosemary


This is recipe no. 3 from our “Italy, The Beautiful Cookbook” challenge.  My husband chose this one, and I am so glad he did.  Insanely simple, with incredibly familiar ingredients, this too, was a winner. The book says that this recipe is from Tuscany, but I am sure there are versions of this from every region in Italy.

I love rosemary.  Rosemary is one of my favorite cooking herbs, thus I have an incredibly large bush on my balcony, and apart from using it in the kitchen, it smells divine.  I think my favorite part is when I’m picking the leaves off the stem, and its sap imparts its beautiful, medicine-like aroma.  During the cooking process your kitchen will smell incredible too, with all that delicious garlic and rosemary!  After the pork is done, you finish the sauce with a nice, dry white wine.  Classic Italian cooking, simple ingredients creating a masterful and superb dish.  Easy enough for a weeknight if you have time, perfect for a Sunday roast, too.

So here’s what you’re going to need:

1 fresh rosemary sprig

6 garlic cloves, crushed

salt and freshly ground pepper

1 chine of pork, about 2 1/2 lbs (1.25kg)

2 tbsp olive oil

1 tbsp butter

1/2 cup (4 fl oz/ 125ml) dry white wine

Finely chop the rosemary leaves.  Mix rosemary and garlic with salt and plenty of pepper.  Rub the meat well with this mixture and tie it securely to the bone.  Place the meat in a dutch oven or aluminum saucepan with the oil and butter.  Bake in a preheated oven at 400F (200C) for 1 1/2 hours, turning frequently.

Untie the meat and remove the bone.  Arrange meat in slices on a serving dish.  Pour wine into the pan and bring to a boil, scraping up browned bits and season to taste.  Serve this sauce with the meat.

Serves 6

From my kitchen to yours,

Carla

Penne Con I Broccoli – Penne with Broccoli

Penne with Broccoli


This is our second recipe from our cookbook “Italy, The Beautiful Cookbook”, and one that my daughter chose.  I wasn’t very surprised, as she loves broccoli, but then I read the rest of the ingredients and thought, she obviously only read the title.  I was quite perplexed at the combination of ingredients as well, broccoli, tomatoes, onions, raisins, anchovies, pine nuts…….in my brain, these ingredients really shouldn’t go together.  But they did, marvelously well, and we were all really surprised.  My hubs mentioned that he felt that it was because there were really no overpowering flavors, it was just the right amount of each ingredient for it to be harmonious, delicate even!

This recipe is from the southern Italian region of Apulia (Puglia).  As the south of Italy was conquered and influenced by the Arabs, this recipe started to make more sense, it was an obvious melange of Arabic and Italian cooking!  The use of savoury and sweet is very Arabic, hence the pine nuts and raisins, but then combining it with broccoli, tomatoes, garlic and anchovies is redolent of southern Italian cooking.  Many of you will want to omit the anchovies, as I know that not everyone is on that bandwagon, but I ask you to try it out, if my daughter, who hates all things fishy, couldn’t tell and was waxing poetic about this recipe, I am positive you won’t either.  Because the recipe calls for you to mash it and then fry it in the olive oil with the garlic, it basically melts in the oil, and adds just a hint of salt and umami to the dish.  If you are still hesitant, reduce the amount, but don’t leave it out!

So here is what you’re going to need:

Serves 6

1/4 cup raisins

1/2 cup olive oil

1/2 onion, chopped

1 can (1lb/500g) whole, peeled tomatoes

salt and freshly ground pepper

1/2 head broccoli

500g Penne pasta

6 anchovy fillets in oil, mashed

2 garlic cloves, chopped

1/4 cup pine nuts

Grated Pecorino cheese

Soak the raisins in lukewarm water to cover until needed.  Heat half the oil in a large skillet over moderate heat.  Add the onion and sauté until translucent.  Add the tomatoes, season with salt and pepper, cover and cook for about an hour to reduce the sauce.

Meanwhile, separate the broccoli into florets and stems.  Peel and slice the stems.  Drop into a saucepan of boiling water and cook until the penne are al dente.

Fry the anchovy fillets gently with the garlic and pine nuts in oil, until the garlic is fragrant, about 3-4 minutes.  Add to the tomato sauce.  Mix in the strained raisins, broccoli florets and a spoonful of the cooking water from the pasta, cover and cook over low heat for about 10 minutes, or until the broccoli is tender, stirring frequently.

Add the strained penne to the skillet, and raise the heat to high, stirring frequently to incorporate all the sauce.  Serve immediately with the grated Pecorino cheese.

From my kitchen to yours,

Carla

Chocolate Hazelnut Biscotti

Chocolate Hazelnut Biscotti


Chocolate Hazelnut Biscotti


Yes, it’s Valentine’s Day.  Happy Valentine’s Day!  I think chocolate is a must-do today, right?  I made these biscotti to take to a coffee for an international group here, where we were all advised to take something sweet or savory, wear red, and bring a gift.  Of course, there were all sorts of treats on hand, but I am quite happy that no one brought anymore biscotti.

I personally love biscotti, which in Italy they are actually called Cantuccini, since biscotti just means cookie.  I have been making them since times immemorial, I think since I was 16 or so, for my mother’s bridge games.  Rarely do I make them with chocolate though, since I find them harder to pair with dessert wines.  Alas, the chocolate tradition won over today, so I naturally decided to pair them with hazelnuts, since all things that resemble nutella are delicious in my book.

I really like these biscotti because not only are they incredibly chocolatey, I don’t use any fats like butter or oil so they are not sooooo damaging to your waistline!  If you can, try to use some high quality chocolate, such as Valrhona, since the main ingredient is chocolate!

So here’s what you’re going to need:

Makes about 30 biscotti (Adapted from the New York Times Recipe)

1/2 cup whole toasted hazelnuts

1 1/4 cups four

1/4 cup good quality cocoa powder

pinch of salt

3/4 tsp baking powder

2 large eggs

3/4 cups sugar

2 tbsp sanding sugar

1 tsp black pepper

Preheat oven to 350F (180C).  In a large bowl, sift together the flour, chocolate, salt and baking powder, set aside.  In the bowl of an electric mixer fitted with the paddle attachment, add the eggs and sugar, beat on medium speed until just mixed.  Reserve one tbsp of the egg mix in a small bowl.

Add the dry ingredients, a little at a time, and beat on low-speed until just incorporated.  Fold in the hazelnuts.

Form into a log shape, about 18 inches long and 3 inches wide, and place on a parchment lined cookie sheet.  Brush on the egg mix you set aside, dust with sanding sugar and the black pepper.

Place in the oven and cook for about 15-20 minutes, or firm.  Take out and let cool for 5 minutes before cutting into diagonal slices, 1 inch thick, with a sharp serrated knife.  Place back on the cookie sheet, on their side, and cook for another 15-20 minutes.

Let cool on a wire rack, and they can be kept in an airtight container for up to 2 weeks.

From my kitchen to yours,

Carla


Michy’s Bread Pudding

MIchy's Bread Pudding photo 2 (1) photo 3 (1)

I am not a huge fan of bread pudding.  I like it, I don’t LUUUURRRVE it.  So, why did I make bread pudding?  Well, two reasons.  1) My daughter begged me to make cheese fondue last week, and I seriously miscalculated the quantities of how much bread we could eat.  2) My good friend Michelle Bernstein (of Michy’s Restaurant in Miami) makes the best bread pudding, hands down.

I tried Michy’s bread pudding 3 years ago when she invited me to eat at her restaurant.  It’s the only dessert she has in her cookbook, “Cuisine a Latina” too.  It’s that good.  What I love about it, is that even though it is quite a rich and decadent dessert, it really doesn’t feel like it, and I think it has to be the addition of brandy, chocolate and the fact that it soaks up the custard for up to 48 hours.  Booze and Chocolate.  Two of my favorite things!  Mixed together, even more yum factor. So, as I generally do, I tweaked her recipe a bit, (But I will give you the original and you can do as you choose!) by using cranberries instead of raisins, and using all of the brandy used to soak the cranberries instead of just a tbsp!  I love the taste of a slightly boozy dessert, but if you prefer yours with a little less ripple, keep to the original recipe!

So here’s what you’re going to need:

1/2 cup raisins (or any dried fruit you like)

Grated zest of 1 orange (I used lemon and it was equally scrumptious)

1 cup brandy or sherry (but go to town, I think rum would even be amazing in this)

2 cups heavy cream

1 cup half and half

6 large egg yolks, at room temperature

3/4 cup sugar

1 tbsp vanilla extract

4 cups diced (1 inch) soft crustless challah, brioche, or white bread (I used crustful baguette)

4 ounces semisweet chocolate, coarsely chopped

Vanilla Ice Cream for serving

Put raisins and orange zest in a small bowl, add the brandy, and let the raisins and zest soak, covered, in the refrigerator for 24 hours or up to 1 week.

Put the cream and half and half in a small saucepan and bring to a simmer over low heat.  Meanwhile, whisk the egg yolks, sugar, and vanilla in a large bowl.  Whisk one-third of the warm cream into the egg mixture, a little at a time, to prevent scrambling the eggs, then whisk in the rest of the cream mixture.

Add the bread to the bowl and stir to soak it with the custard.  Cover the bowl with plastic wrap and refrigerate for at least 24 hours, or up to 48 hours.

Put a rack in the center of the oven to 325F (170C).  Butter six 4 to 6 ounce ramekins or baking dishes.  Drain the raisins, reserving the brandy.  Add the raisins and a tablespoon of the brandy to the bread mixture and mix well.  Spoon into the prepared ramekins or baking dish.  Sprinkle chocolate over the top of the bread puddings.  Put the ramekins in a roasting pan and fill the pan with enough warm water to come halfway up the sides of the ramekins.  Bake, uncovered, until the pudding is just set, about 25 minutes; when you shake the pan, the custard should wobble for just a moment.

Remove the pan from the oven and carefully place the ramekins on small serving dishes.  Serve the bread pudding hot, with a scoop of vanilla ice cream right on top.

From my kitchen to yours,

Carla